プロジェクト
これまで学んできた知識を利用して、はじめての Web アプリケーション作りに挑戦してみましょう。 題材が思いつかない場合は、下の例を参考にしてみてください。
カウンター
数を数えることができるアプリです。
ステップ 1: シンプルなカウンター
数を表示する部分があります。+ と書かれたボタンをクリックすると、数が 1 ずつ増えます。
<!doctype html>
<html lang="ja">
  <head>
    <meta charset="utf-8" />
    <title>カウンター</title>
  </head>
  <body>
    <!-- 数を表示する部分をここに書く -->
    <!-- ボタンをここに書く -->
  </body>
</html>
let counter = 0;

function countUp() {
  // ボタンがクリックされたときの処理を書く
}

// ボタンがクリックされたときにcountUp関数を呼び出す
document.getElementById(/* ボタンのid名 */).onclick = countUp;
解答例: カウンター (ステップ 1)
<!doctype html>
<html lang="ja">
  <head>
    <meta charset="utf-8" />
    <title>カウンター</title>
  </head>
  <body>
    <p id="counter-value">0</p>
    <button id="count-up-button" type="button">+</button>
  </body>
</html>
let counter = 0;

function countUp() {
  counter = counter + 1;
  document.getElementById("counter-value").textContent = counter;
}

document.getElementById("count-up-button").onclick = countUp;
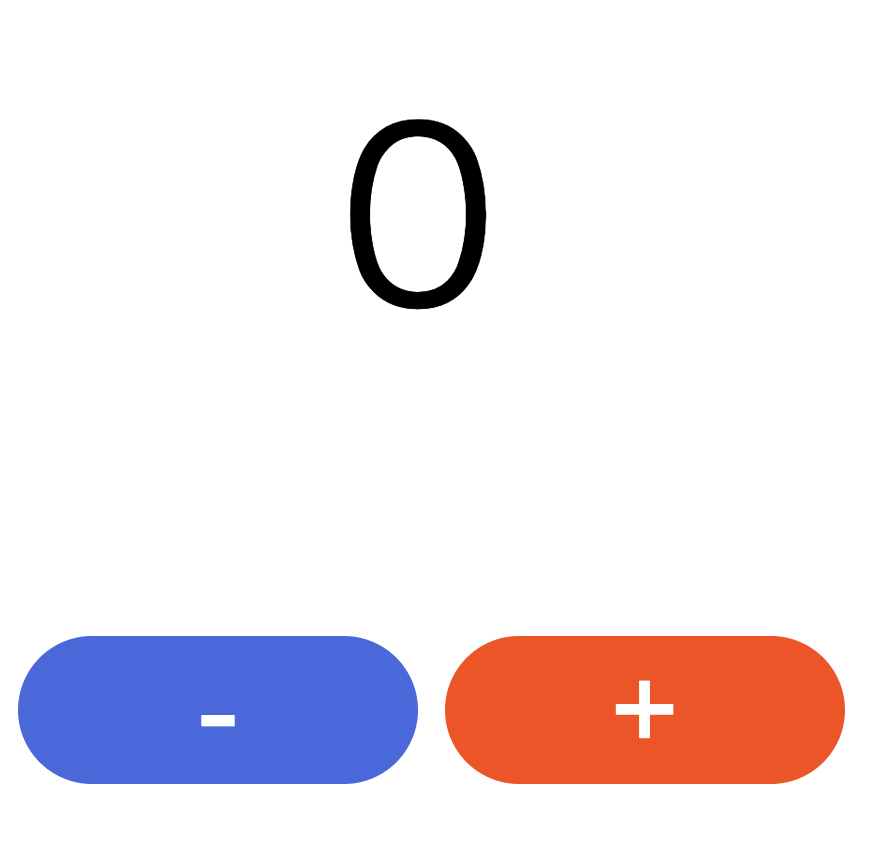
ステップ 2: マイナスボタンを追加
- と書かれたボタンを新たに作成し、数を 1 つずつ減らせるようにしましょう。
解答例: カウンター (ステップ 2)
<!doctype html>
<html lang="ja">
  <head>
    <meta charset="utf-8" />
    <title>カウンター</title>
  </head>
  <body>
    <p id="counter-value">0</p>
    <button id="count-down-button" type="button">-</button>
    <button id="count-up-button" type="button">+</button>
  </body>
</html>
let counter = 0;

function countUp() {
  counter = counter + 1;
  document.getElementById("counter-value").textContent = counter;
}

function countDown() {
  counter = counter - 1;
  document.getElementById("counter-value").textContent = counter;
}

document.getElementById("count-up-button").onclick = countUp;
document.getElementById("count-down-button").onclick = countDown;
ステップ 3: スタイルを追加
CSS を使って、作成したカウンターの見た目を整えましょう。
これまでに扱った文字色や背景色、文字サイズだけでなく、「テキストを中央揃えにする」「角を丸くする」などの方法も調べて使ってみましょう。
#counter-value {
  width: 160px; /* 幅の指定 */
  font-size: 48px;
  /* ここで、テキストが中央揃えになるよう指定する */
}

#count-down-button {
  width: 80px;
  font-size: 24px;
  border: none; /* 枠線を表示しないよう指定 */
  /* ここで、角が丸くなるよう指定する */
  /* その他の指定をする */
}

#count-up-button {
  width: 80px;
  font-size: 24px;
  border: none;
  /* ここで、角が丸くなるよう指定する */
  /* その他の指定をする */
}
解答例: カウンター (ステップ 3)
#counter-value {
  width: 160px;
  font-size: 48px;
  text-align: center; /* テキストが中央揃えになるよう指定 */
}

#count-down-button {
  width: 80px;
  font-size: 24px;
  border: none;
  border-radius: 20px; /* 角が丸くなるよう指定 */
  background-color: royalblue;
  color: white;
}

#count-up-button {
  width: 80px;
  font-size: 24px;
  border: none;
  border-radius: 20px; /* 角が丸くなるよう指定 */
  color: white;
  background-color: orangered;
}
おみくじ
今日の運勢をランダムで表示するアプリです。
ステップ 1: おみくじの機能を作成
- 20%の確率で
大吉と表示し、文字色を赤色にします - 50%の確率で
吉と表示し、文字色を黒色にします - 30%の確率で
凶と表示し、文字色を青色にします
ランダムな数を使う
Math.random 関数は、呼び出すたびに変わる 0 以上 1 未満の乱数 (ランダムな数) を戻り値として返します。
document.write(Math.random()); // 0.8924949384481442
発生させた乱数を r などの名前の変数に保存して、確率の計算に使いましょう。
例えば r が 0 以上 0.2 未満になる確率は 20% になりますね。同様に、r が 0.2 以上 0.7 未満になる確率は 50%、r が 0.7 以上 1 未満になる確率は 30% です。
let r = Math.random();
if (r < 0.2) {
  // 20%の確率で実行される処理を書く
} else if (r < 0.7) {
  // 50%の確率で実行される処理を書く
} else {
  // 30%の確率で実行される処理を書く
}
<!doctype html>
<html lang="ja">
  <head>
    <meta charset="utf-8" />
    <title>おみくじ</title>
  </head>
  <body>
    <!-- 結果を表示する部分をここに書く -->
    <!-- ボタンをここに書く -->
  </body>
</html>
function omikuji() {
  let r = Math.random();
  if (r < 0.2) {
    // 20%の確率で実行される処理を書く
  } else if (r < 0.7) {
    // 50%の確率で実行される処理を書く
  } else {
    // 30%の確率で実行される処理を書く
  }
}

document.getElementById(/* おみくじを引くボタンのid名 */).onclick = omikuji;
解答例: おみくじ (ステップ 1)
<!doctype html>
<html lang="ja">
  <head>
    <meta charset="utf-8" />
    <title>おみくじ</title>
  </head>
  <body>
    <p id="result">結果</p>
    <button id="omikuji-button" type="button">おみくじを引く</button>
  </body>
</html>
function omikuji() {
  let r = Math.random();
  if (r < 0.2) {
    document.getElementById("result").textContent = "大吉";
    document.getElementById("result").style.color = "red";
  } else if (r < 0.7) {
    document.getElementById("result").textContent = "吉";
    document.getElementById("result").style.color = "black";
  } else {
    document.getElementById("result").textContent = "凶";
    document.getElementById("result").style.color = "blue";
  }
}

document.getElementById("omikuji-button").onclick = omikuji;
ステップ 2: スタイルを追加
CSS を使って、作成したおみくじの見た目を整えましょう。
これまでに扱ってきたプロパティに加えて、「テキストを縦書きにする」などの方法も調べて使ってみましょう。
#result {
width: 60px;
height: 120px; /* 高さの指定 */
font-size: 48px;
font-family: serif; /* フォントを指定 */
/* ここで、テキストが中央揃えになるよう�指定する */
/* ここで、テキストが縦書きになるよう指定する */
}
#omikuji-button {
width: 160px;
height: 36px;
border: none;
/* ここで、角が丸くなるよう指定する */
/* その他の指定をする */
}
解答例: おみくじ (ステップ 2)
#result {
  width: 60px;
  height: 120px;
  font-size: 48px;
  font-family: serif;
  text-align: center; /* テキストが中央揃えになるよう指定 */
  writing-mode: vertical-rl; /* テキストが縦書きになるよう指定 */
}

#omikuji-button {
  width: 160px;
  height: 36px;
  border: none;
  border-radius: 10px; /* 角が丸くなるよう指定 */
  color: white;
  background-color: gray;
}